Weatherproof Steel Siding Installation Guide
Weatherproof Steel Siding Installation offers a durable and aesthetically pleasing exterior solution for homes. This guide delves into the process, from initial preparation and material selection to the intricacies of installation and long-term maintenance. We’ll explore the advantages of steel siding over other materials, highlighting its longevity and low-maintenance nature. Discover the step-by-step techniques required for a professional-looking finish, including handling challenging areas and ensuring watertight seals. This comprehensive guide empowers homeowners and professionals alike to successfully complete this rewarding project.
Choosing weatherproof steel siding is a significant investment, impacting both the visual appeal and the structural integrity of your home. Understanding the nuances of installation is crucial to maximizing its benefits. This guide provides a detailed walkthrough, covering everything from selecting the right type of siding and preparing the surface to mastering complex installation techniques and ensuring proper sealing. We’ll also address common challenges and offer practical solutions to guarantee a long-lasting, weather-resistant exterior.


Introduction to Weatherproof Steel Siding
Steel siding offers a compelling alternative to traditional materials like wood or vinyl, providing superior durability and longevity for your home’s exterior. Its weather-resistant properties contribute to reduced maintenance and increased property value, making it a smart and practical choice for homeowners seeking a long-term solution.
Steel siding’s inherent strength and resistance to impact damage, rot, and insect infestation significantly reduce the likelihood of costly repairs and replacements compared to wood siding. Furthermore, its fire-resistant properties contribute to enhanced home safety. Unlike vinyl, steel siding doesn’t fade or crack under harsh weather conditions, maintaining its aesthetic appeal for years.
Types of Weatherproof Steel Siding
The market offers a variety of steel siding profiles designed to mimic the look of other materials while retaining the inherent advantages of steel. These options cater to diverse architectural styles and personal preferences.
- Panel Siding: This classic style features horizontal or vertical panels, often available in various widths and lengths. Its simple design makes installation straightforward and efficient.
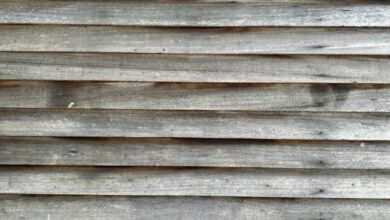
- Shake and Shingle Siding: Designed to replicate the look of natural wood shakes or shingles, this type offers a more rustic and textured appearance. It provides a similar aesthetic without the maintenance challenges of wood.
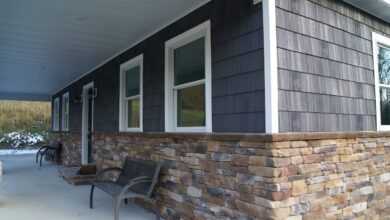
- Board and Batten Siding: This style uses wider vertical boards with narrower strips (battens) covering the seams, creating a clean, linear look. It is often favored for its modern and sophisticated appeal.
Lifespan and Maintenance of Weatherproof Steel Siding
High-quality steel siding, with proper installation and minimal exposure to extreme conditions, boasts an exceptionally long lifespan. Many manufacturers offer warranties of 30-50 years or more, showcasing the material’s inherent durability. While steel siding is inherently low-maintenance, regular cleaning is recommended to remove dirt and debris. A simple pressure washing once or twice a year typically suffices. Minor scratches or dents are easily repairable, minimizing the need for extensive repairs. For example, a small scratch can often be touched up with paint, while more significant damage might require panel replacement, a process generally less complex and costly than repairing comparable damage to wood or vinyl siding.
Pre-Installation Preparations
Proper preparation is crucial for a successful weatherproof steel siding installation. Failing to adequately prepare the surface can lead to issues such as uneven siding, poor adhesion, and premature deterioration. This section outlines the necessary tools, surface preparation steps, and best practices for measuring and cutting the steel siding panels.
Necessary Tools and Equipment
Gathering the right tools beforehand streamlines the installation process and ensures a professional finish. Having everything readily available prevents delays and ensures efficiency. A comprehensive tool kit should include: measuring tape, level, chalk line, safety glasses, work gloves, tin snips, circular saw with metal-cutting blade (or a nibbler), drill with appropriate drill bits, self-tapping screws, sealant, and a hammer. Additional tools, such as a speed square and a pry bar, may also prove beneficial depending on the complexity of the project.
Surface Preparation
Thorough surface preparation is paramount for a long-lasting and aesthetically pleasing installation. This involves several key steps: First, inspect the existing wall for any damage, such as rotting wood, loose or damaged sheathing, or protruding nails. Repair or replace any damaged sections, ensuring a solid and even surface. Next, clean the surface thoroughly to remove any dirt, debris, loose paint, or other contaminants. A pressure washer can be effective, but care should be taken to avoid damaging the underlying structure. Finally, ensure the wall is completely dry before proceeding to the installation of the steel siding. Moisture trapped behind the siding can lead to corrosion and other problems.
Measuring and Cutting Steel Siding Panels
Accurate measurements are essential to avoid waste and ensure a precise fit. Begin by carefully measuring the wall sections to be covered. Allow for overlaps and expansion gaps as recommended by the manufacturer’s instructions. Use a chalk line to mark the cutting lines on the steel siding panels. For straight cuts, a circular saw with a metal-cutting blade is generally preferred for its speed and precision. For intricate cuts or curves, tin snips or a nibbler might be more suitable. Always wear appropriate safety glasses and gloves when cutting steel siding panels to protect against sharp edges and flying debris. Remember to regularly check your measurements and cuts to maintain accuracy throughout the process. Precise cuts minimize waste and contribute to a professional-looking installation.
Installation Process
Installing weatherproof steel siding is a multi-step process requiring careful planning and execution. Proper installation ensures the longevity and effectiveness of the siding, protecting your home from the elements for years to come. This section provides a detailed, step-by-step guide to ensure a successful installation.
Step-by-Step Installation Guide
The following table outlines the installation process, materials, and tools needed for each stage. Remember to always consult the manufacturer’s instructions for your specific siding product.
| Step | Description | Materials | Tools |
|---|---|---|---|
| 1. Preparation | Ensure the wall is clean, dry, and free of any debris or loose materials. Address any necessary repairs to the underlying structure. Establish a consistent starting point for the siding installation. | Cleaning supplies, repair materials (as needed) | Broom, scraper, level, measuring tape |
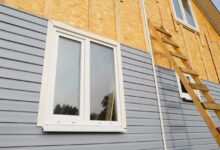
| 2. Flashing Installation | Install flashing around windows, doors, and other penetrations to prevent water intrusion. Flashing should overlap appropriately to create a watertight seal. | Flashing, sealant | Caulk gun, hammer, nails |
| 3. Starter Strip Installation | Install the starter strip along the bottom edge of the wall, ensuring it is level and plumb. This provides a consistent base for subsequent panels. | Starter strip, sealant | Level, measuring tape, drill, screws/nails |
| 4. Panel Installation | Begin installing siding panels, overlapping each panel according to manufacturer’s specifications. Use self-tapping screws or nails, ensuring proper spacing to allow for expansion and contraction. Always use fasteners appropriate for the siding material and wall type. | Steel siding panels, self-tapping screws or nails | Drill, screwdriver, nail gun (optional), level, measuring tape |
| 5. Corner and J-Channel Installation | Use J-channel or corner trim to neatly finish the exterior corners of the building. These pieces provide a clean, professional look and protect the edges of the siding. | J-channel or corner trim, sealant | Measuring tape, snips, drill, screws |
| 6. Window and Door Trim Installation | Install trim around windows and doors, ensuring a tight seal and aesthetically pleasing finish. Proper flashing is critical behind these trims. | Window and door trim, sealant | Measuring tape, snips, drill, screws, caulk gun |
| 7. Final Inspection | Carefully inspect the entire installation, checking for gaps, misaligned panels, or other imperfections. Address any issues before moving on. | None | Level, measuring tape |
Fastening Techniques
Proper fastening is crucial for the longevity and performance of the steel siding. Fasteners should be driven straight and evenly spaced to avoid damage to the panels. Over-tightening can cause damage, while under-tightening can lead to loose panels and water penetration. Consult the manufacturer’s specifications for recommended fastener type, size, and spacing. For example, using stainless steel screws prevents corrosion and ensures a durable connection.
Managing Corners, Windows, and Doors
Corners, windows, and doors require special attention during installation. Using J-channel or corner trim creates a neat and watertight finish at the corners. Around windows and doors, proper flashing and trim are essential to prevent water leakage. These components should be installed before the main siding panels to ensure a seamless integration and prevent gaps. Precise measurements and careful cutting are necessary for a professional-looking installation. For example, using a coping saw for precise cuts around windows will ensure a perfect fit.
Dealing with Difficult Areas
Installing weatherproof steel siding around complex architectural features and on uneven surfaces requires careful planning and execution. Proper techniques ensure a watertight, aesthetically pleasing, and long-lasting installation. Failing to address these challenges can lead to leaks, compromised aesthetics, and premature siding failure.
Successfully navigating these challenges involves a combination of precise measurements, specialized tools, and a thorough understanding of the siding system’s capabilities. Adaptability is key, as each project presents unique complexities requiring customized solutions.
Siding Installation Around Complex Architectural Features
Dormers, chimneys, and other architectural protrusions present unique challenges to siding installation. These areas often require intricate cuts and specialized flashing to maintain a watertight seal. Careful planning and precise measurements are crucial to ensure a seamless integration of the siding with these features.
For example, around a dormer, the siding needs to be carefully cut and fitted to follow the contours of the roofline. Overlapping flashing should be installed under the siding to prevent water penetration. Similarly, chimneys require careful flashing around the base and top to prevent water from seeping behind the siding. Properly sized and installed J-channel or similar trim pieces are crucial for a neat and weatherproof finish around these complex areas.
Handling Uneven Surfaces or Wall Imperfections
Uneven walls or imperfections in the underlying structure can significantly impact the installation of steel siding. These irregularities can lead to gaps and potential leaks if not properly addressed. Various methods exist to overcome these challenges, ensuring a smooth and even final appearance.
Before installation, assess the wall for significant imperfections. Minor imperfections can often be accommodated by using furring strips to create a more even surface. For more substantial irregularities, consider using shims or other methods to level the surface before applying the siding. This preparation work is essential to ensure the siding lays flat and provides a consistent, watertight barrier. Failure to address these imperfections could result in visible gaps or bowing of the siding.
Ensuring Watertight Seals Around Penetrations
Penetrations such as windows, doors, and vents require special attention to maintain a watertight seal. Improper sealing around these areas is a common source of water damage. Proper flashing and sealing techniques are essential to prevent water intrusion.
For each penetration, appropriate flashing should be installed before the siding is applied. This flashing should extend beyond the edges of the penetration to create an overlap with the siding, preventing water from seeping behind it. Use high-quality sealant around all joints and seams to further enhance the watertight seal. A careful inspection of all penetrations after installation is crucial to ensure the complete absence of gaps or leaks.
Flashing and Sealants
Proper flashing and sealing are critical for the longevity and effectiveness of your weatherproof steel siding installation. These techniques prevent water intrusion, which can lead to significant damage, including rust, rot, and structural compromise. Neglecting these steps can void warranties and necessitate costly repairs down the line.
The selection and application of appropriate flashing and sealants are paramount. Different materials offer varying degrees of durability and weather resistance, requiring careful consideration based on the specific climate and building conditions. Incorrect installation can render even the highest-quality materials ineffective.
Flashing Types and Applications
Several flashing types are commonly used with steel siding. Each is designed to address specific vulnerabilities in the building envelope. Proper selection and installation are crucial to creating a completely sealed system.
- Drip Edge Flashing: Installed at the roofline, this prevents water from running behind the siding. It typically consists of a pre-formed metal piece with a lip to divert water away from the building’s exterior.
- J-Channel Flashing: Used at the edges and corners of the siding, this creates a channel to guide water away from the building. Its ‘J’ shape neatly integrates with the siding panels.
- Window and Door Flashing: These specialized flashings create a waterproof seal around openings, preventing water from penetrating the wall system. They are usually comprised of multiple pieces designed to overlap and create a barrier.
- Step Flashing: Used where the siding meets a sloped roof, step flashing involves overlapping pieces of metal that are individually installed to create a watertight seal, effectively channeling water down the roof. Each piece is carefully interwoven with the roofing material.
Sealant Selection and Application
Choosing the right sealant is equally important as choosing the right flashing. Sealants bridge gaps and seal joints, preventing water penetration. The choice of sealant depends on the specific application and environmental conditions.
- Silicone Sealant: Offers excellent weather resistance and durability, making it suitable for many exterior applications. It’s known for its flexibility and ability to withstand temperature fluctuations.
- Butyl Sealant: Provides a strong, long-lasting seal and excellent adhesion to many surfaces. It’s often preferred for applications requiring high resistance to UV degradation.
- Acrylic Sealant: A more paintable option, acrylic sealant offers good weather resistance but may not be as durable as silicone or butyl in extreme conditions. It’s frequently used for smaller gaps and less demanding applications.
Flashing Installation Best Practices
Correct flashing installation is critical to prevent water damage. All flashing should be installed in accordance with the manufacturer’s instructions.
- Proper Overlap: Flashing pieces should always overlap to create a continuous barrier against water. The lower piece should always overlap the upper piece to direct water downward.
- Secure Fastening: Flashing should be securely fastened to the building structure using appropriate fasteners. This ensures it remains in place even during high winds or heavy rain.
- Caulk all Joints: All joints and seams in the flashing should be carefully sealed with a high-quality sealant to prevent water penetration. This is crucial to maintain the integrity of the waterproof barrier.
- Continuous Seal: Ensure a continuous seal around all penetrations, such as windows and doors. This often requires using multiple flashing components to create a completely sealed envelope.
Safety Precautions During Installation
Steel siding installation, while rewarding, presents several potential safety hazards. Understanding and mitigating these risks is crucial for ensuring a safe and efficient project. This section outlines key safety precautions to observe throughout the installation process.
Working at heights, handling sharp materials, and operating power tools all contribute to the inherent risks associated with this type of project. Adherence to established safety protocols and the consistent use of appropriate personal protective equipment are paramount to minimize the likelihood of accidents and injuries.
Working Safely at Heights
Safe work practices at heights are essential, particularly when installing siding on multi-story buildings. Using appropriate fall protection systems is non-negotiable. This includes the use of safety harnesses, anchored securely to a robust structure, and appropriate safety lines. Furthermore, proper scaffolding or ladders must be employed, ensuring they are in good condition, appropriately positioned, and used according to manufacturer instructions. Regular inspections of all equipment are necessary before each use to identify and rectify any potential hazards. For example, a ladder should always be placed on a stable, level surface, extending at least three feet above the landing point, and secured if possible. Failure to comply with these safety measures can result in serious injury or even fatality.
Personal Protective Equipment (PPE)
The appropriate use of personal protective equipment (PPE) is non-negotiable for all personnel involved in the installation. This includes, but is not limited to: safety glasses or goggles to protect against flying debris, hearing protection to mitigate the noise from power tools, work gloves to protect hands from cuts and abrasions, steel-toed boots to protect feet from dropped objects or heavy materials, and a hard hat to protect the head from falling objects. Depending on the specific task, additional PPE might be required, such as respirators to protect against dust or fumes from cutting and welding operations. Regular inspection and maintenance of PPE are critical to ensure its effectiveness. For instance, damaged gloves should be replaced immediately, and safety glasses should be cleaned regularly to maintain clear vision.
Potential Hazards and Mitigation Strategies
Several specific hazards are inherent in steel siding installation. Sharp edges of the siding panels can cause cuts, necessitating the use of gloves and careful handling. Power tools, such as drills, saws, and shears, pose risks of injury from moving parts or accidental contact. Proper training on the safe operation of these tools, along with the consistent use of appropriate safety guards, is crucial. Working at heights, as previously discussed, presents a significant risk of falls. The use of appropriate fall protection equipment and adherence to safe work practices are paramount. Finally, exposure to the elements, such as sun, wind, and rain, can lead to dehydration or hypothermia. Proper hydration and appropriate clothing are necessary to mitigate these risks. Regular breaks in shaded areas are recommended, particularly during periods of intense heat.
Post-Installation Inspection and Maintenance
A thorough post-installation inspection is crucial to ensure the weatherproof steel siding is correctly installed and will provide years of reliable protection. This inspection should be performed immediately after installation completion and will identify any potential issues early, minimizing the need for extensive repairs later. Regular maintenance will further extend the lifespan of your siding and maintain its aesthetic appeal.
Post-installation inspection and routine maintenance are vital steps to ensure the long-term performance and aesthetic appeal of your weatherproof steel siding. Neglecting these steps can lead to premature deterioration and costly repairs.
Post-Installation Inspection Checklist
This checklist outlines key areas to examine after the installation is complete. A systematic approach ensures no detail is overlooked.
- Verify all panels are securely fastened and aligned, with no gaps or overlaps exceeding manufacturer specifications. Examine panel edges for proper alignment and sealing.
- Inspect all seams and joints for proper sealing and caulking. Look for any gaps or cracks that may allow water penetration.
- Check the flashing around windows, doors, and other penetrations for proper installation and sealing. Ensure all flashing overlaps are correctly positioned to prevent water intrusion.
- Examine the entire siding for any damage incurred during installation, such as scratches, dents, or punctures. Note the location and severity of any damage.
- Verify that all trim and accessories are properly installed and secured. Check for any loose or damaged components.
- Inspect the drainage system to ensure proper water flow away from the building. Look for any obstructions or areas of ponding.
Routine Maintenance Tasks
Regular maintenance is essential to prevent problems and prolong the life of your steel siding. These tasks are relatively simple and can be performed annually or as needed.
- Clean the siding regularly using a soft brush and water. Avoid abrasive cleaners that can scratch the surface. For stubborn stains, use a mild detergent solution.
- Inspect the siding for any signs of damage, such as dents, scratches, or loose panels. Address any issues promptly to prevent further damage.
- Check caulking and sealant around windows, doors, and other penetrations for cracks or gaps. Reapply sealant as needed to maintain a watertight seal. This is particularly important in areas exposed to extreme weather conditions.
- Inspect the drainage system to ensure proper water flow. Clear any debris or obstructions that may impede drainage.
- Inspect the flashing around windows, doors, and other penetrations to ensure it remains secure and free of damage. Replace damaged flashing promptly.
Addressing Potential Post-Installation Problems
Prompt identification and resolution of post-installation problems are crucial for maintaining the integrity of the steel siding. Early detection prevents minor issues from escalating into costly repairs.
- Water Leaks: Leaks are often indicated by water stains or discoloration on the interior walls. Carefully inspect the affected area, looking for gaps in caulking, damaged flashing, or loose panels. Repair or replace damaged components as needed.
- Loose Panels: Loose panels can be identified by movement or rattling sounds. Tighten loose fasteners or replace damaged panels to ensure secure attachment.
- Rust or Corrosion: While steel siding is designed to resist corrosion, damage to the protective coating can lead to rust. Clean the affected area and apply a touch-up paint designed for steel siding to protect the exposed metal. For significant corrosion, panel replacement may be necessary.
- Damage from Impact: Dents or scratches from impacts can be repaired using specialized fillers and paints designed for steel siding. Severe damage may require panel replacement.
Cost Considerations and Budgeting
Planning the budget for weatherproof steel siding installation requires careful consideration of various factors influencing the overall project cost. A thorough understanding of these factors will enable homeowners to make informed decisions and avoid unexpected expenses. Accurate budgeting ensures a smooth and financially responsible project completion.
The total cost of installing weatherproof steel siding is influenced by several key factors, including the size of the house, the chosen siding type and quality, labor costs in your region, and any necessary preparatory work. It’s crucial to obtain multiple quotes from reputable contractors to compare pricing and services.
Cost Breakdown of Weatherproof Steel Siding Installation
The following table provides a general estimate of the costs involved. These are averages and may vary depending on location and specific project details. Always obtain detailed quotes from contractors for your specific project.
| Cost Component | Cost Range (USD) | Factors Influencing Cost |
|---|---|---|
| Materials (Siding, Fasteners, Flashing) | $3,000 – $10,000 | Type of steel siding (thickness, finish, color), quantity needed, brand reputation. |
| Labor | $4,000 – $12,000 | Contractor’s experience and hourly rate, project complexity, regional labor costs, and the time required for the installation. |
| Preparation and Tear-off (Existing Siding Removal) | $1,000 – $5,000 | The condition of existing siding, amount of debris removal, and disposal fees. |
| Permits and Inspections | $200 – $1,000 | Local regulations and requirements for building permits. |
| Contingency (Unexpected Costs) | 10-15% of total estimated cost | Unforeseen issues like damaged materials or additional labor needed. |
| Total Estimated Cost | $8,200 – $28,000+ | This is a broad range and can vary significantly based on the factors mentioned above. |
Factors Influencing Overall Project Cost
Several factors can significantly impact the final cost of your weatherproof steel siding installation. Understanding these will help you better prepare your budget.
| Factor | Impact on Cost | Example |
|---|---|---|
| House Size and Complexity | Larger houses and complex designs require more materials and labor, increasing costs. | A two-story house with multiple gables will cost more than a single-story ranch. |
| Siding Type and Quality | Higher-quality steel siding with thicker gauges and premium finishes will be more expensive. | A thicker gauge steel siding with a Kynar finish will cost more than a thinner gauge with a less durable finish. |
| Labor Rates | Labor costs vary significantly by region and contractor experience. | Labor rates in a major metropolitan area will typically be higher than in a rural area. |
| Existing Siding Condition | Removing old siding adds to the project cost, especially if it’s difficult to remove. | Removing asbestos siding requires specialized handling and disposal, increasing the cost. |
| Extra Features | Adding features such as custom trim, extra insulation, or specialized installation techniques will increase the overall cost. | Installing custom-designed trim around windows and doors will add to the total project cost. |
Examples of Weatherproof Steel Siding Installations
Choosing the right steel siding for your home involves considering not only its weather resistance but also its aesthetic appeal. The versatility of steel siding allows for a wide range of design options to complement various architectural styles. The following examples illustrate how different siding profiles and color schemes can transform the look of a home.
The proper installation of weatherproof steel siding significantly impacts both the visual appeal and the longevity of the siding. A well-installed system will present a clean, uniform look, enhancing the curb appeal of the property. Conversely, poor installation can lead to premature damage, such as leaks, buckling, or discoloration, significantly reducing the lifespan and aesthetic value of the siding.
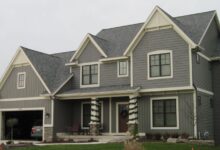
Ranch Style Home with Steel Siding
This example features a classic ranch-style home clad in a deep charcoal gray steel siding with a horizontal profile. The clean lines of the siding complement the low-pitched roof and simple design of the ranch. A lighter gray trim around the windows and doors provides a subtle contrast, enhancing the architectural details.
- Siding Color: Deep Charcoal Gray
- Siding Profile: Horizontal, smooth panel
- Trim Color: Light Gray
- Overall Aesthetic: Modern, clean, and sophisticated.
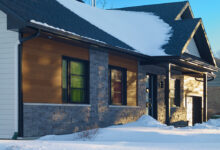
Victorian Style Home with Steel Siding
This Victorian home showcases the adaptability of steel siding to more intricate architectural styles. The siding is a warm, earthy brown with a textured, vertical profile that mimics the look of wood clapboard. The rich color and detailed profile complement the home’s ornate detailing, such as gables and decorative trim. Dark brown accents are used around the windows and doors to create depth and further enhance the Victorian aesthetic.
- Siding Color: Warm Earthy Brown
- Siding Profile: Vertical, textured clapboard
- Trim Color: Dark Brown
- Overall Aesthetic: Traditional, warm, and inviting.
Modern Style Home with Steel Siding
This modern home features a sleek, contemporary design accentuated by a light gray steel siding with a horizontal, ribbed profile. The clean lines and subtle texture of the siding create a minimalist aesthetic. Large windows are framed by matching light gray trim, allowing the natural light to flood the interior. A contrasting dark gray accent is used on the roofline, adding a touch of visual interest.
- Siding Color: Light Gray
- Siding Profile: Horizontal, ribbed panel
- Trim Color: Light Gray
- Accent Color: Dark Gray
- Overall Aesthetic: Modern, minimalist, and elegant.
Ending Remarks
Successfully installing weatherproof steel siding transforms your home’s exterior, providing lasting protection and enhanced curb appeal. By following the detailed steps outlined in this guide, you can confidently navigate the installation process, from initial planning to final inspection. Remember, meticulous preparation, precise execution, and attention to detail are key to achieving a flawless and durable result. Investing time in understanding the techniques and safety precautions will ensure a successful project and years of enjoyment from your new siding.